 I'm mainly aware of two types: lockable and open stitch markers - and because necessity is the mother of invention, I know a do-it-yourself-version for both as well as commercially available ones. The advantages and disadvantages of lockable compared to open ones are probably quickly and easily explained: the lockable ones don't slip so easily, but of course, you have to open them again when moving them. Especially if you have to quickly access the marker again and again, this can be annoying (for example if you are working on a small Amigurumi); on the other hand, you can also just leave them open in such a case. The disadvantage of the purchased ones is also quickly stated: they are more expensive.
A small side note: when buying the lockable version, make sure the edges are not sharp. I bought these markers twice, once all the edges were clean and without problems (the first purchase), and the second time ironically a few markers had protruding edges that could damage the yarn.
Another reason why I would actually recommend at least one such marker to everyone: If you have to put your project aside (for example, because the food is on the table...), you can beautifully secure the stitch with the lockable marker (of course, only when crocheting, with knitting this would be a laborious task).
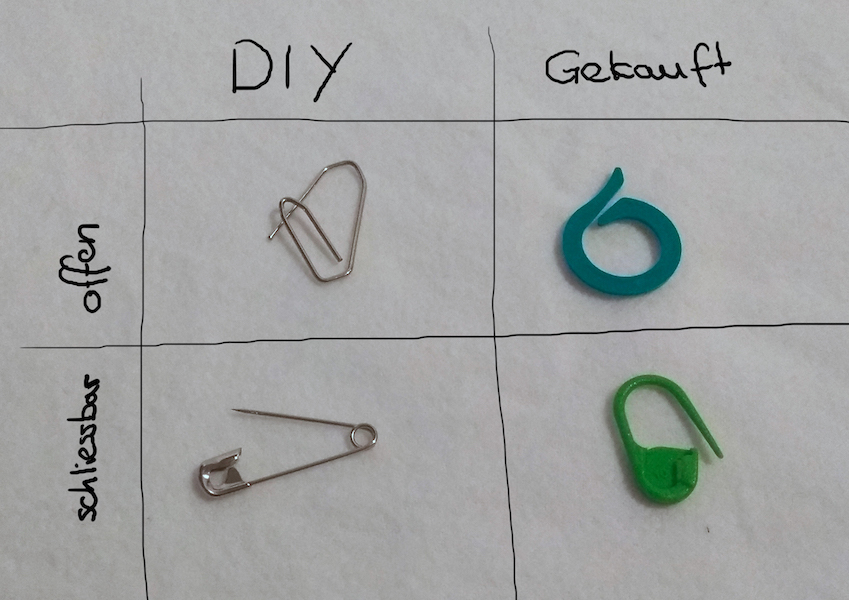
Whether it should be a DIY or purchased one is up to you. I generally like my purchased ones because they are designed not to damage the yarn. Nevertheless, there is an obvious reason why I know the homemade versions! Before the holidays, everything is diligently packed: yarn, crochet hooks, instructions, and a measuring tape - and when you want to get started, you realize that the markers that are lying around everywhere at home (like hair bands) are still exactly there: at home! As I said, necessity is the mother of invention. For open markers, paper clips are suitable: bend them slightly, and you already have your open marker that holds well and serves its purpose. If you're lucky, you'll also find a safety pin that serves as a closed marker. Here, you just have to be careful not to prick the yarn or yourself and always close it to avoid bloodstains - yes, I speak from experience, and yes, I'm a little bit clumsy.
By the way, in case of emergency, a piece of yarn also works. Personally, I've tried it once, and never again: It worked wonderfully until I thought it was a leftover thread and wanted to dispose of it... And my marker was gone!
Again, find out what the best marker is for you. If you don't have a preferred type yet, just try the DIY versions - that should help you get a feeling before you buy any.